Getting started#
This document is intended to get you started as quickly as possible. We discuss two important underlying concepts, the package’s core classes and how to combine them, and we end with a simple example in which we create a trial as might be used in an auditory perception experiment.
Step 1: Concepts#
Consider the example sequence given below:


In a sequence or rhythm, each event (in most cases, a sound) is presented at a specific point in time: the event onset. The difference in time between the onset of one event and the onset of the next event we call the inter-onset interval (IOI).
Inter-onset intervals (IOIs) and onsets#
For timing sequences and events, throughout this package we make the most use of inter-onset intervals (IOIs). IOIs represent the interval between the onset of one event, and the onset of the next event. Because IOIs are onset-to-onset, which is different from inter-stimulus intervals (which are offset-to-onset), we can think about these sequences in terms of rhythms. This because often the duration of the event is irrelevant to the type of beat that is induced in the listener.
Onsets (i.e. t values) are used internally, and only in some special cases. When creating sequences on the basis of IOIs, it is assumed that the first onset is at t = 0. However, you can create sequences with a different onset than zero, for that see thebeat.core.Sequence.from_onsets().
End sequence with event or interval#
An important concept to mention here is that sequences can end with an event, or end with an interval. In effect, this means that sequences that end with an event have n events, but n-1 IOIs. Sequences that end with an interval have n events and n IOIs. The default is for sequences to end with an event, but for rhythms or for combining sequences we need sequences that end with an interval. Otherwise, we would not know what interval to place between the offset of the final event in a sequence and the onset of the first event in the next sequence.
To end sequences with an interval, we pass end_with_interval=True to the Sequence constructor.
Step 2: Combining and converting between classes#
This visualization displays the major classes that are used throughout this package.
Some of them we can combine into other ones:

Sequence and Rhythm objects contain only timing information. SoundStimulus objects contain acoustic information.
Trials are made from combining a SoundStimulus and Sequence object into a SoundSequence object which contains both audio and timing information. You can either pass the SoundSequence one or multiple (i.e. one for each event) SoundStimulus objects.
Rhythm objects first have to be converted to a Sequence object before we can combine them into a SoundSequence trial (using the to_sequence() method). Finally, from a Rhythm we can make a Melody.
At this point the most important thing to remember is that the Sequence class is the one you will be using most.
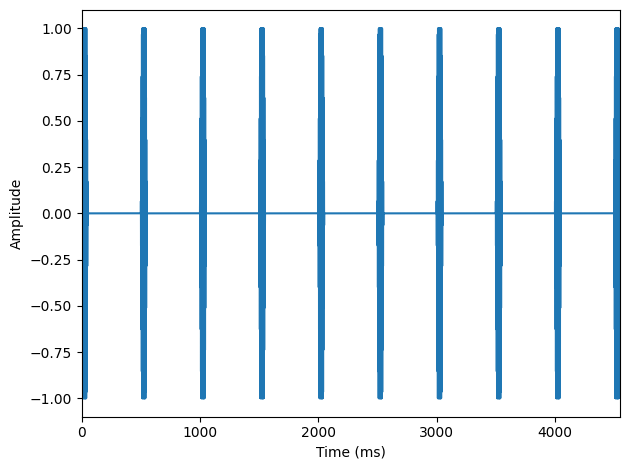
Step 3: Your first trial#
Here we will create a simple isochronous (i.e. regular) trial of 10 events at a tempo of 500 ms (i.e. each IOI is 500 ms, corresponding to 120 bpm or 2 hertz). It contains the same pure tone sound stimulus of 50 ms at a pitch of 440Hz with a linear on- and offramp (attack/decay) of each 10 ms.
[2]:
from thebeat import Sequence, SoundStimulus, SoundSequence

seq = Sequence.generate_isochronous(n_events=10, ioi=500)
stim = SoundStimulus.generate(freq=440, duration_ms=50, onramp_ms=10, offramp_ms=10)
trial = SoundSequence(stim, seq)

#trial.play()  # play sound over loudspeakers
trial.plot_waveform()  # plot as sound waveform
trial.write_wav('example_trial.wav')  # save file to disk
[3]:
# This is only so you can listen to the sound here. On your computer, simply execute trial.play()
from IPython.display import Audio
Audio(trial.samples, rate=trial.fs)
[3]:
Learn more#
If you want to learn more, you can take a look at the Examples section, at the Lookup table, or see the Core classes page under API reference.